Reflecting some of the available light onto a sleeping baby's face, for instance, can be as simple as having your assistant (read as DH or DW) hold a piece of white paper or white cardboard at such an angle as to illuminate the child's facial features in a little more attractive way. The assistant may need to be properly bribed to perform this complex function, but that's another whole discussion :-) If you want to change the facial colors a little, don't use a white card, use a pastel colored one instead. The card is usually at least 8-1/2' x 11", but can certainly be larger if more reflected light is needed. White and colored card stock (or construction paper) is usually readily available at stationary or craft stores.
You can also use a frosted mirror to reflect light onto a subject, or a card covered with aluminum foil, or an aluminum panel with a buffed natural finish. A white card or sheet of white paper is usually the easiest reflector to come up with quickly, and a white surface won't change the colors or create any "hot" spots, because of it's natural diffusion (unfocused reflected light).
Keep in mind that available light photography indoors usually requires the use of a tripod as well. Lower light levels cause your camera's automatic exposure system to select a very slow shutter speed, and slow shutter speeds mean that the camera must be held perfectly stable to avoid any blur when taking the picture. Also think in terms of "squeezing" the camera's shutter release button slowly, rather than "snapping" a picture. In fact, snapping a picture should never be done, always actuate the shutter release button with as little camera movement as you possibly can, even outdoors in full sunlight. The term "snapping a picture" is one we should all try to forget, it's rarely a good idea.
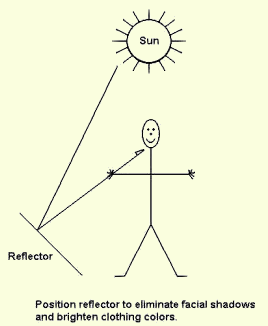
By the way, don't be afraid to use a white card reflector outdoors as well, pros do it all the time. When the sun is high in the sky, people's faces will often be shadowed by their own features, that is, shadows can often be seen under the eyes, the nose and the chin. Reflecting some diffused white light up and onto their faces will often solve (or soften) the problem in a 'natural' way, and you and your assistant can immediately see what the effect will look like (unlike using a fill-flash which may or may not do the job that you hoped for).
The figure shows one relative position for a reflector when used outdoors to soften shadows under the eyes, the nose and the chin. Hey, I never said I could draw!
So there you have it, how to use a white card reflector ... now that has to be the most inexpensive accessory you'll ever get for your camera!
Note: I didn't mention anything about "color correction", which is also a consideration for indoor available light photography. With digital cameras, color correction is often automatic, for film cameras, it's a complex subject that deserves a rather involved discussion of its own.
Dave